Print Parade 2018 Artwork Setup

Print Parade 2018: How Is the Artwork Set Up?
Moving right along on our journey of print discovery, we come to the creation of the product artwork. Previously we covered what makes a good image; what separates a bad logo from a good logo, from where and what types of graphics make good prints, and how you can get your finalized image into our hands. Once you have the file you want on your product we need to change that image into art.
There are two ways we can accomplish this:
#1: Celina Artwork Department
In case you aren’t the most savvy with imaging programs or computers in general, Celina does offer artwork setup and creation services. We can take your image – provided you have followed the guidelines covered previously – and place it on a product template. This will give you an approximate sample of what the product will look like once it leaves the printers.
The ensemble will be laid out according to your product and any stipulations you’ve added to your image upload (either email or website submission), including color specifications or layout issues. Once we’ve created the template it will be sent back to you for checks before we start any fabrication.
#2: DIY Image Template Manipulation
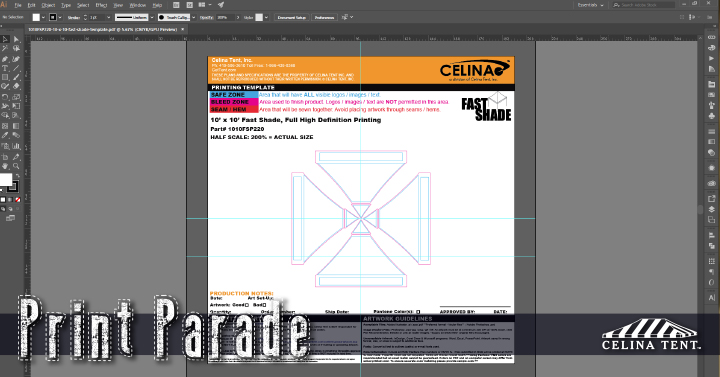
To ensure that you create the exact image exactly how you want it, Celina has product templates available on every product page on our website free to download. Simply click on the “Custom Printing” tab on the product page, then the template for the item’s fabric or printed portion. Available in PDF format, you can use these templates to layout and design your own product on your own time.
Open the PDF in imaging software to begin creating your own product. Each template has instructions and a key to tell you about the different areas of the template, including:
- Finished Zone: This is the area that takes up most of the space on the product; it shows the product areas that will be visible once it’s finished.
- Safe Zone: This is the area of the product best suited for designs, and can be filled with images, text, colors, or whatever your items needs. Manufacturing processes (sewing, sealing, etc.) will not affect these areas.
- Bleed Zone: These zones will be directly affected by manufacturing, and so make poor areas for logos and images. Sew lines, hardware, and more will obscure the printed surface.
Your finished template can be saved as a PDF for inspection; remember to name your file with your company name or last name for processing simplicity and easy location.
Finality
Whether you’ve assembled the template yourself or let our art department work their magic, you will be sent a rendering of the product for finalization. Celina is currently in the process of generating rotate-able 3D models to give you the clearest impression of what your ordered product will look like upon completion! You will receive an email with a link to your rendering, which you can view and rotate to your heart’s content.
Combined with our entries on Image Specifications and Sending Us Your Files, this completes the customer participation portion. Our final blog next week will be covering the review process, including product-specific 3D renderings. Just in case we haven’t quite covered any questions you have, feel free to give us a call at 844-803-9444 to speak with our Printed Sales Associate or email you question to Art@CelinaTent.com.
Visit our other Print Parade articles:
Print Parade 2018: Is My Image a Good Image?
Print Parade 2018: How and Where Do I Send my Artwork?

